Showing posts with label hacking. Show all posts

Monday, January 23, 2012

The Man Cave

It has been a long time, so I thought I would give a quick update on what has been keeping me busy lately (apart from family, work, and life in general of course). Last year I decided I needed a workshop. I was tired of spending an hour to move cars, arrange machinery, clean up, move machinery, and move cars again, every time I wanted to cut a piece of wood. Not to mention the fact that I could never do anything that required any sort of setup as I couldn't afford to leave things in any sort of steady state (besides "put away") for more than a weekend.

So I started digging.

This is what I started with:


And many, many (*MANY*) wheelbarrow loads later, I was part-way done:


And with a lot of sweat and some help from my good friend Todd, I got even further.


In the process, I was in between many a hard place and these:


But eventually, I got it to the point where I was ready to do something with the space.


And with a lot of understanding from my wife, and a lot of help from my brother, my dad, once again Todd, and the rest of my family and friends, I finally got the beginnings of a workshop.


And with a little more blood, sweat, and swears (and a significant amount of money), and some more help from Todd and my friend John, I have my very own Man Cave.


And tonight, Todd and I used that Man Cave to finish up this little beauty:


I want to say a huge "Thank You" to everyone who helped me make this little workshop a reality. I certainly have a fair amount of work left when the weather warms up again, but having this space to work in is awesome.

All I need now is a beer fridge and a scotch dispenser!
Stay tuned for more posts in the future!

Friday, October 23, 2009

RichCopy

This little gem of a utility saved me a lot of time (after wasting a good deal of it) the other night.

RichCopy

If you're like me and sometimes just can't be bothered figuring out arcane command lines (I fought with xcopy and robocopy before finding this), you may find this utility handy if you're a Windows user. I was trying to copy a DVD with many corrupted files on it and xcopy was incrementally choking (even with ignore errors turned on it was failing - go figure).

Anyway, two thumbs up on RichCopy.

Sunday, January 25, 2009

Clean Power

As part of my guitar effects house-cleaning I thought I would build a real 9VDC power supply rather than the mish-mash of batteries and hacked up wall wart that I use now. I also wanted to learn Eagle as it is always touted as the best, free CAD package out there for hobby electronics. I decided to start with this circuit for an adjustable power supply from Tonepad. Tonepad is great, but I think a lot of their layouts aren't the greatest since they don't try to minimize the amount of copper you must etch off of the copper-clad board. As a result, etching takes longer and you end up using more ferric chloride. This isn't really a concern, but I figured I could come up with an more optimal layout, and basically used this as an excuse to learn Eagle. I've never actually designed a single layer PCB before (my previous designs have been double-layer boards, ordered online from ExpressPCB), and never realized how difficult it was to route things given the single-layer design constraint. As a result, it took me much longer than I expected. I ended up with this layout:


I think it turned out alright, and I learned a lot in the process. Eagle is definitely much harder to use than ExpressPCB, but it has quite a bit more functionality (most of which I don't know how to use).

I also decided to experiment with Sharon's scrapbooking machine while I was at it. Instead of trying the usual toner-transfer method of etching the PCB, I thought I would try cutting the mask out of vinyl and etching the board that way. I loaded up her Klic-n-Kut, and cut out the layout which I had exported from Eagle.


I then applied the mask to the copper clad board. If you look really close you will see that the mask produced by Sharon's machine actually isn't all that great. I am on the very edge of the capability of her machine in terms of size. Basically, the size of the pattern I am trying to cut is so small, the machine can't produce it (the knife works by pivoting around a slightly off-center pivot point, which is about the size of one of the corners in my layout). There may be various ways around this, but I may just end up going back to the toner-transfer method for future layouts.


After about 15 minutes in ferric chloride, I had a PCB for my power supply.


All that was left was to drill the PCB and mount the components. After a bit of smoke (I soldered in one of the diodes backwards...oops!), the result was a working 9VDC power supply for my future guitar effects projects.


From Effects Pedals

Friday, January 2, 2009

Tonelab For Sale

I'm selling my VOX Tonelab SE in an effort to minimize my guitar rig in 2009. If anyone reading this knows anyone who may be interested, feel free to contact me. The Kijiji ad is here.

I think I'll try to round out my sound with a few more home-brew pedals. I have a Tube Screamer and a Ross Compressor built. I'll need to find some good designs for a chorus and delay pedal and perhaps a flanger and a simple reverb unit. I wonder what's involved in building a tuner as well. Hmm... Tonepad here I come.

Monday, September 1, 2008

Mandatory Software

As Doug has already mentioned, an interesting product from Google is being released tomorrow: Google Chrome. I guess the rumors were true after all! Since I have recently re-formatted my computer and I am currently in the midst of re-installing all of my applications, their timing is relatively good.

I discovered something interesting while re-installing software on my PC. After re-ghosting my machine (and installing various hardware drivers, Windows XP Service Pack 3, and a large number of updates), I installed the following software first:


So Eclipse wasn't the first thing I installed, but it was quite near the top; and Vuse uses SWT under the covers so that's a pretty good showing for Eclipse-sponsored software in my little world. Also keep in mind this is my home PC, not my work laptop - so this list is not particularly tailored to full-on software development (hence the Steam install). I'll have to do another list when my work computer gets reincarnated. ;o)

I remember the Python blogging community chipping in about what programs they use daily (and would install first on a new machine) and it was quite interesting. I wonder what other people's short list might look like?

Saturday, August 30, 2008

A Tale of Three Partitions

Lately my home PC has had issues, the most annoying of which being that it would fail to install any Windows Installer (.msi) based product unless I dropped to a command line and forced it to install manually using:
runas /user:Administrator "msiexec.exe /i C:\full\path\to\installer.msi"

This was getting really annoying, and I have also been having my 13-in-1 card reader sporadically "go missing". I have a fairly new Dell XPS 710, and it is a pretty sweet machine. I can't complain about this thing as it is built like a tank and it is definitely a luxury model compared to past PCs I've had. Dell really knows how to build a machine.

Anyway, the Windows Installer thing has been bugging me for weeks because I have flexed all of my significant geek muscle trying to fix this problem and have come up empty handed. I was quite proud when I figured out the "runas" workaround (without it all installers just flash up a window and silently fail), but the fact that I cannot fix this problem just drives me nuts. I've tried removing almost every Windows-based component (.NET, Silverlight, etc.) and hacked around in the registry all to no end. So yesterday I decided to buy a second 500GB hard drive, and start from scratch (preserving my significant amount of data on the original 500GB drive).

Last night I started out by downloading a copy of the Linux-based Clonezilla LiveCD, and I used it to successfully clone my old drive to the new one. I knew from previous hacking that there were two other partitions on my hard drive besides my main data partition and I figured these were special Dell system partitions involved in the restore process and further investigation showed that they were in fact partitions containing the Dell diagnostics as well as a ghost image of the factory default WinXP installation. I basically now had two disks containing the following:

+------+--------------+-----------------+
| 47MB | 496GB NTFS | 3GB System |
| Diag | (Windows) | Restore |
+------+--------------+-----------------+

Sure enough, I was able to boot from either drive and ended up with an identical working installation of Windows XP. So the next step was to restore the factory default disk image. I had what I thought was a recovery CD and proceeded to boot from it. It turns out, it was not a recovery CD, but a re-installation CD. I figured there was a chance it would still somehow use the system partitions to install the old factory image onto my 496GB NTFS partition. Well, it installed Windows, but it did not restore the factory install - it just installed Windows. As a result, most of my hardware did not work; not even my network card so I couldn't even access the internet to figure out what to do next!

So I decided to boot from a boot disk and have a look around the third 3GB partition and found there to be a couple batch files and executables (basically Norton Ghost), and a ghost image that *was* a backup of my factory default. I was able to manually run recover.exe and restore the ghost image to my NTFS partition, but when I rebooted I was greeted with an error message that indicated Windows setup was not completed properly and to install again. Weird. At this point I figured there *has* to be a way to restore my machine from this ghost image using Dell's built-in support for this. A little Googling revealed I should be able to simply press Ctrl+F11 after the initial boot screen to initiate the restore procedure. After trying this, I was greeted with the error message Cannot recover. Much more searching and I found this very informative Dell forum thread:
http://www.dellcommunity.com/supportforums/board/message?board.id=dim_other&message.id=274416&query.id=299988#M274416

This ultimately led me to this website which contains a very detailed breakdown of the Dell system partitions, what they contain, and how they are used during the boot process. There are also utilities there for fixing your master boot record code, partition types, and more. Wow, this looked like just the ticket! However, after repairing everything (my MBR code and partition types were messed up during the cloning/re-installing of Windows process) I was still not able to get Dell's built-in recovery procedure to work.

Eventually, I tried resetting the partition types on the original disk to be normal FAT16 and FAT32 partitions (as opposed to special, hidden partitions) using the ptedit.exe utility, then re-cloning them to the new disk with Clonezilla, resetting them *back* to hidden, then attempting to recover by manually running recover.exe, as suggested by the owner of goodell.net in another thread. It was suggested that perhaps the source partitions being configured as odd, hidden types would confuse the cloning software causing things to be cloned incorrectly. Setting the partition types to standard FAT16 and FAT32 types before cloning may alleviate this problem. This time after restoring from the ghost image and rebooting it worked, and I am up and running with a fresh installation of Windows XP (with no Windows Installer issue!). Now to re-install all of the programs I use every day, and slowly migrate my data over from the old drive.

On a positive note, I can't say enough about the build quality of Dell computers. I have 6 SATA ports on my motherboard, and this computer comes with a neatly routed power connection and SATA cable to every drive bay in my machine. Also, every drive bay has a plastic drive carrier inserted in each location. The amount of money you save in not having to purchase cables and plastic bits and baubles alone is staggering. Finally, there are no fasteners required on anything. There is a spring-loaded mechanism on everything so pretty much any drive or component can be removed by pressing a button or sliding a lever. Check this out:


Anyway, here's a big "thank you" to Dan Goodell for his awesome utilities and instructions. You've obviously helped a lot of people with this in the past and you've just helped one more. I owe you a beer!

Monday, April 14, 2008

Hacking At Home

I came across this awesome hack of not only completely automating an espresso machine with a microcontroller and an LCD, but controlling it all with a Wii Nunchuk controller.


Sweet. Now I wonder if my wife will let me take a dremel to her Christmas present...?

Thursday, January 31, 2008

Lucky's Laptop Repair

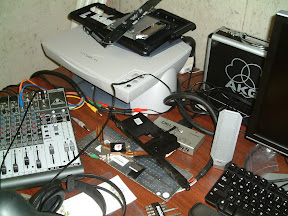
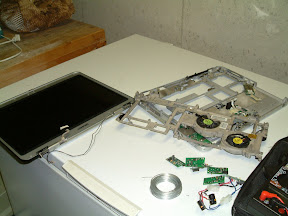
Recently a friend of mine asked me if I could look at his laptop for him. The screen (both LCD and external monitor) was showing multi-colored, vertical bars and was generally screwed up. I tore it down and did a lot of searching and came to the conclusion that the graphics chip was screwed. Since these are soldered directly to the mainboard I searched high and low for a reasonably-priced one from HP (yeah, right...) and on eBay. While the eBay prices were about a third of the cost of a new one, it was still prohibitively expensive and wasn't worth fixing.

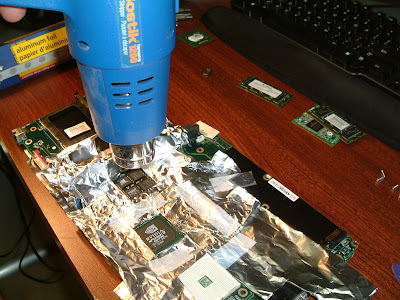
Not one to be thwarted so easily, I kept scouring eBay for parts and busted laptops of the same model to no avail. Eventually, while searching one night for a potential source or method of replacing the chip itself, I stumbled upon a thread in a Mac forum about iBooks that apparently had a known flaw where the graphics chip would flake out. Someone figured out it was due to a poor connection between the chip and the motherboard (rather than the chip itself being screwed) and decided to try to fix it themselves with a heat gun. The graphics chips on most modern laptops are surface mounted using a ball grid array type configuration. If you can heat up the solder underneath enough to re-melt it (without melting the graphics chip or the motherboard, of course) you can fix the poor connection.

Well, since I had spent so much time on this and it was really starting to irk me, I figured what the hell, I've got nothing to lose at this point. So I borrowed a heat gun from a friend (thanks, Todd!), and tore the sucker down again.


I grabbed a bunch of aluminum foil and shielded the surrounding areas.


Then I threw caution to the wind and cranked up the heat.


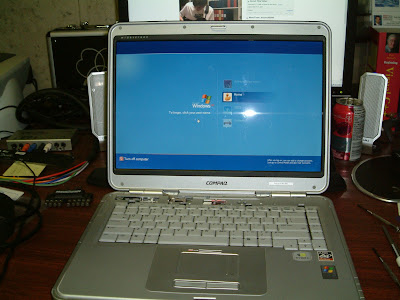
I then re-assembled it all (with no extra screws, I might add; which rarely happens when I start tearing stuff down like this) and flipped the switch. Would it work....?

.
.
.

OH GOD!


Initially, the screen stayed black for a few seconds and I figured I had finally pooched it for good with too much heat. And then...


Nice. I fricking rule. Although with the amount of time I have spent on this particular challenge, I probably could have earned enough money to buy a new one 10x better. Oh well. That's not the point, right?

Monday, July 23, 2007

Dreaming of Coolness

This is without a doubt *the* coolest thing I have seen on the internet.

http://worrydream.com/

I can only dream of being this awesome. This guy's only fault amongst his heaps of uberness is the fact that he used Perl to write bkasm. ;)

Wednesday, May 23, 2007

While I'm Up

I may as well post about my activities on the weekend as well. I spent the long weekend (finally) working on the next guitar amp. In particular, I took my robotic table saw for its maiden voyage and cut the finger-jointed pieces out for the cabinet. It worked great! There were definitely some lessons learned, and I think I'll have to improve the cycle time for any sort of volume production, but I am happy with the result.


You can see more pictures, and a couple of videos on my Picasa page.

Hello Again, Linux

Well, tonight I decided to once again re-visit the world of Linux. I have an old desktop PC at home that I have run XP on for quite a few years and I had a brief stint with Vista on it as well. However, this PC is finely aged (AMD Athlon XP 1200, 3DLabs VX1 graphics) and it failed to pull off Aero so what's the point, right?

Right. So I decided to try Linux again. I have been dabbling with Linux for years, ever since the days of Mandrake 7, Corel Linux, and Redhat 5. I was on Peanut Linux for the longest time, but mostly because I had crap hardware. I only ever ran it as a server anyway because I found it unusable as my main desktop machine in those days.

Well, I have been running Ubuntu on my home server for a couple years now and I must say that I have found my distro. I like the way it works. So I tried to install Fiesty Fawn (FF) tonight on this "dated" PC. I had recently set up FF on my work machine in a VMWare image for some testing I had to do and it was a pleasure to install. Well, let's just say I didn't fare so well tonight.

I stuck in the CD and watched it boot. Well...actually I watched two lines flash by and then a black screen. My machine appeared to be frozen at this point and there was nothing I could do except press reset and watch it all over again. A quick Google search brought me here:

https://bugs.launchpad.net/ubuntu/+source/syslinux/+bug/62453/

Turns out, the video card I have is not really supported by the installer GUI. Understandable - it is quite old and - GOOD NEWS! - there was a workaround! Hold down the shift key and boot in text mode. Pressing ENTER on the boot screen now fired up the GUI installer no problem and I could install FF. Cool! However, the largest resolution I could get was 800x600, and unfortunately this is not quite big enough to show the install wizard in all its glory. I could not see any of the Next or Back buttons (if that is in fact what they are labelled - I never saw them) and there was no way to resize the install wizard smaller. ARGH! But I, being the incredible hacker that I am, managed to blindly tab through assuming the right-most button on all of the install wizard pages would be Next, or Confirm, or whatever - and I haphazardly plowed through the installation process without ever actually seeing what it was I was pressing. Well, it seemed to work.

OK, so I now have Ubuntu 7.04 installed. However, I am still limited on my screen resolutions and to be honest 800x600 simply doesn't work. No problem - the bug tells me to grab some lines out of my /var/log/Xorg.0.log file and put them into my /etc/X11/xorg.conf file and all is well. The trouble is - it doesn't tell me what lines. Well, I guess it is assuming a basic level of X11 knowledge that is slightly higher than mine. Now I'm starting to sweat. X has always been the bane of my Linux existence. In fact, I would go so far as to call it a bastard. Right to its face. With its mother standing right beside it. Seriously - I actually had it completely fry a monitor on me way back in my Peanut Linux days by probing my graphics adapter with the wrong frequencies. Luckily that was a crap monitor. But I did not feel like sacrificing my 19" NEC to the X11 demons this evening, thank you very much!

But this story has a (somewhat) happy ending. I did manage to figure things out after some more searching and trial and error (with my sweaty fingers tightly crossed I might add). And I did take the time to add my experiences for the benefit of others to the bug report.

So! Ubuntu is locked and loaded and I am going to give it a whirl. I'm assuming trying to run Beryl/Compiz on my geriatric 3DLabs card (it *was* a screamer in its day!) is going to be a non-starter. Oh well - that would have been cool to play with.

As it sits, it is 12:50am and my wife has long gone to sleep while I tried to "quickly install Linux before I went to bed". Sigh. Hello again, Linux (you sonofabitch).


P.S. In all seriousness - kudos to the Ubuntu people. Ubuntu Linux is quite simply the best alternative out there, IMHO. And I *am* posting this from Opera - freshly installed into my shiny new Ubuntu installation.

Wednesday, May 2, 2007

The Saga Continues...

Well, I guess I'll never get a fricking Amiga running OS4 now.

http://amigaworld.net/modules/newbb/viewtopic.php?topic_id=23032&forum=2

Personally, I tend to put my faith behind Hyperion on this one and I think their court documents will prove me right. Amiga Inc. is run by a bunch of MBAs who only seem to know how to spend capital on useless technology and equally-useless court battles. Unfortunately there are some people who think this will have a quick resolution. I know that won't happen. The last open-and-shut court case I have personally experienced from the sidelines is still unresolved after almost 6 years.

Sigh.

Tuesday, April 3, 2007

Robosaw Links

So, one of my projects has been "roboticizing" my table saw to cut hyper-accurate finger joints (fully automated, of course). I have completed it enough to actually make joints automatically, but it is a pain to adjust the spacing as the drives are programmed in a very limited assembly language, and I need to update the programs in both drives to tweak things. It is a pain because of the trial and error involved in getting the indexes to match the cut widths due to the tolerance of a blade cutting through wood (it's not at all like machining metal...).

Anyway, here is a Picasa album of the various stages in the process as well as a couple poorly-lit video clips.

http://picasaweb.google.com/mark.melvin/RoboSaw

http://video.google.ca/videoplay?docid=-5829562471987966238
http://video.google.ca/videoplay?docid=-3239961827766871169

The next step in the process is to write a PC-based interface to this. The drives will actually accept commands via a serial connection, so it will be much easier to send the commands in the order I want and tweak the numbers that way. I just need the time to do it...